The rotating racking arm.
Parts needed are: 1 & 1/2" TC fitting, a solid end cap that attaches to the TC fitting, TC clamp, Teflon gasket, a 1/2" half coupler, or a 1/2" female full coupler cut in half, a racking cane in 3/8" or 1/2" and your ball valve, all in stainless steel.
I use a TC that is 1" at the end that welds to the conical. I get s.s. racking cane and cut it to fit as trying to bend stainless is real difficult. With the end cap, you drill it to fit your racking cane, insert this piece through the cap and braze the end flush. The difficult part is the piece that attaches to your ball valve. I use a 1/2" FPT half coupler x 2 inches. It sets on the cap after you attach the racking arm. You carefully braze a sanitary bead inside this 1/2" coupler to attach it to the cap. This fitting is where you thread your ball valve onto. It is assumed that you also made a smooth sanitary flush weld on the inside of the conical to attach your TC fitting for the racking arm and possibly for a dump valve also. I choose to use 1" TC because it's a smaller hole to drill in your conical. Note that a 1" TC is the diameter at the butt end, where you weld. The flange end is still 1 & 1/2". You will need titanium and cobalt drills to drill stainless steel. The titanium drills go up to 1/2" and are gold colored. They are commonly found at hardware stores. The cobalt are a little harder to find. I have 5/8 , 3/4 and 1" in cobalt. To do the racking port and drill out a solid end cap, a drill press is very handy. Any drilling on the conical will be done with a hand drill however. Another must have item to use is a small round carbide cutter. This you use in your drill to widen your holes slightly after using the drill, if you need to make the hole a little bigger. Here are some pictures:
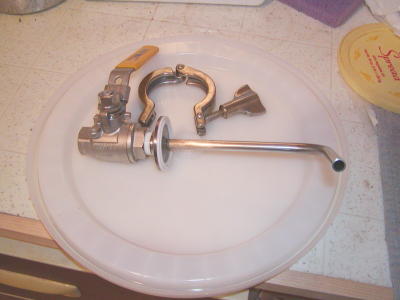
The Teflon gasket can be lubed with food grade jell to make turning the racking valve easy. As shown here, you have the cap and racking arm as one piece. You can see the white plumbers tape between the valve and the cap. This is the 1/2" pipe coupler, threaded to the racking assembly. Reference a mark on the pipe nipple where the valve will thread on so it is in position, in relation to the position of the racking cane, before welding. When it is done, it should line up like the one shown in this picture.
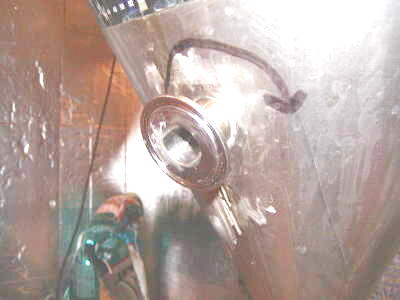
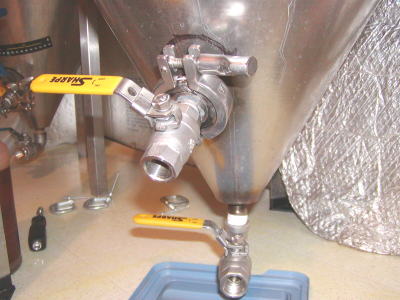
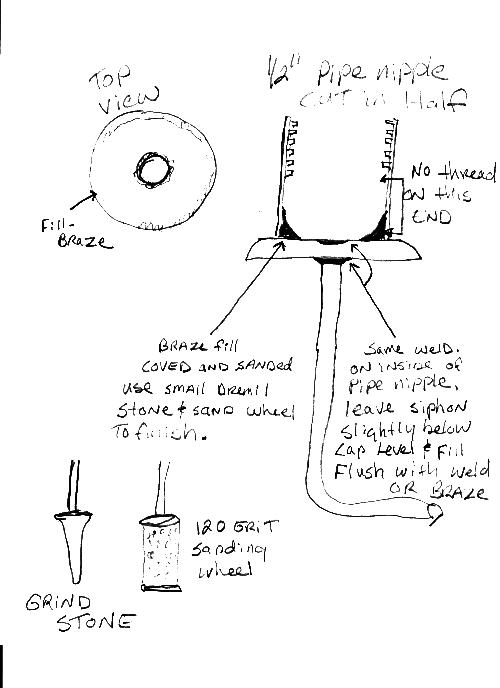
As shown here, the TC fitting is brazed onto the conical. I put an arrow on the conical for a reference of the direction to turn it when racking. Shown below, is a drawing of the brazing job and assembly that was done to mate the racking arm to the cap, with a 1/2" coupler. This is probably the most difficult part of making your conical, as brazing on the inside of a 1/2" female threaded coupler leaves little room to move.
It will also be helpful to look at other conicals to see how the lid hold down assembly is built. I also highly recommend welding a TC fitting on the bottom of the conical for a dump valve. The restrictions of trying to harvest yeast through a 1/2" pipe nipple and ball valve drove me crazy. It's like watching paint dry sometimes, just waiting to get some flow. The added expense of the ball valve, (around $80.00 at BB3) is worth it! I also recommend welding a TC onto the lid and getting the C02 ball lock - cap fitting.
![]()