Using Stainless Steel Conical Fermentors
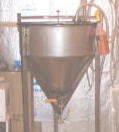
I currently have three stainless steel conical fermentors in my home brewery. The advantages of a conical, is that you can use it for both the primary and secondary fermentation. I’ve found that dumping trub & yeast can be done a couple of times during the process of fermentation. When the beer reaches finished gravity, or is almost finished, (within a couple of points of FG) I will begin harvesting yeast. Two of my conicals have sanitary butterfly dump valves. These valves make harvesting yeast an easy job. My 12.5 gallon conical had the 1/2" pipe nipple and ball valve for the dump port as purchased. I have found the 1/2" pipe nipple welded to the bottom of a conical to be the most frustrating part of this design. The diameter is way to small to pass a yeast that has the consistency of soft ice cream, as one of my favorites, WYEAST 1968 does. In light of this problem, it's important to harvest yeast when the beer finishes out and before it sits without fermentation activity, as it will get really thick and will be very hard to get flowing through your 1/2" pipe fitting. I also should mention that you probably don't want to use a 3/8" Barb fitting on the dump valve because the restriction of flow will clog up the process of removing trub and yeast. I used to use a 5/8" barb x 1/2" male threaded pipe fitting and 5/8" tube. I have since put a 3/4" ball valve with adaptor to the welded 1/2" pipe nipple to help with the process of yeast dumping. It has helped but I think I will end up cutting the welded pipe nipple off and welding in a TC fitting like my other conicals in the future. In any event, to avoid problems when harvesting yeast, the timing on this process is kind of critical. If you attempt to dump trub and yeast while fermentation is really active, you'll get a lot of beer loss, as a lot of solids and yeast are still in suspension or bouncing around while fermenting. If you wait to long, (your beer reached F.G. 4-5 days ago) it may flow like sludge and you'll be banging on the conical, pipe fittings, squeezing the tubing, or trying anything you can think of to get it moving. Sounds like I’ve done this before eh? After the first day that you remove the trub and yeast you should do another pull the next day and the day after to see if there may be some more to remove before the beer starts flowing. I usually take two pulls over two days when harvesting yeast, and a third pull on kegging - bottling day. The trub is usually a little brownish at first and will start to clear with brown specks in the flow until you start to see a mostly white flow as you are drawing it out. Many times the yeast flow will not even look very "dirty" with what is known as trub. If you brewed a dark ale, the trub and yeast are almost the same color. When this is the case, you should look for specks and particles in the flow to decide when you will start collecting the yeast to save. If you made a starter from a yeast package, you won't get a whole lot of yeast from this first generation harvest, so you may want to figure on saving everything and not worry about discarding the slight amount of trub that may flow out first. It will probably take a few batches of beer until you perfect this process. I should also mention that you will need to remove the airlock before drawing off anything through either valve, as your sanitizing solution will be sucked out of the airlock and into your beer. I have a small disk filter mated to an airlock for this purpose. You could also wet a paper napkin with sanitizer and place it over the hole on the rubber stopper after removing the airlock. On my lids equipped with a TC fitting, I have a cap with a ball lock Co2 fitting that can be attached, so that I can inject some Co2 at 1 to 2 psi, instead of introducing oxygen to the beer. This is really my favorite set-up, with the TC and Co2 fitting to keep a blanket of Co2 on the beer all through the process. I highly recommend this conversion if you want to make one more great improvement to your conical. More on this subject below.
When your beer is finished it helps to lower the temperature of the room if you can, to help settle out the yeast in the beer at this point. A thermostat and heater control my fermentation room, so it’s not a problem, except during the hot days of summer. I wait one to two days after removing yeast before kegging, to aid in settling and clarification. When you are ready to rack off the beer to kegs, or bottle, you could take one more pull on the bottom dump valve to remove any yeast left. What little is left, will come out fairly quick and your clear beer should follow the flow relatively fast. Now it’s time to rack the beer! (I know you’ve been impatiently waiting for this moment) This is where a rotating racking arm comes into play. I highly recommend getting a conical with a racking port as it serves two great purposes. You can take samples for specific gravity readings and you will rack off a clear flow of beer for testing and kegging-bottling. Although you could do this with just a bottom dump, you will never get a completely clear flow of beer. You will always have some yeast dropping out of suspension and settling at the bottom of the cone and some yeast will always cling to the very bottom of the cone and never come out of the dump valve. Have I mentioned keep it clean and sanitary? Of course we all know that! Keep a spray bottle of sanitizer, (I like Idaphor), around to spray the inside of your valves, and anything else that has contact with the beer.
The method for racking is to start the flow of beer and slowly turn the racking arm down until you just start to see some yeast or cloudy pickup with the flow. You then turn it slightly back up to where the beer flow is clear and finish racking. You will lose some beer this way in the bottom of the cone, but if you want the clarity of the final product, this is the best method to use. You can always drop what remains through the dump valve when finished, for a big cloudy glass of beer. Another great advantage is that you could leave the yeast in the fermentor and pitch another batch of beer right on top of your yeast without having to open up the conical and clean up first! Be sure to let the beer settle out for a few days before doing this however, as you want the maximum amount of yeast to drop out of suspension and settle for the next batch.
I should mention a couple of disadvantages at this point. The first is obvious. You can’t see what is going on inside the fermentor. Another is that it’s difficult to see how full the fermentor is getting when you fill it. If you know your kettle volume, it’s not a problem, however if your brewing in large equipment and going for a near full fermentor capacity, it can bring some new considerations into the process. For example: I just did a 28-gallon batch in a 31-gallon fermentor. That left 3 gallons of headspace for fermentation and krausen, (beer foam). My conical has a 24” inside diameter and gallons are measured in mere inches at this point. I figured I had about 2 to 3 inches of headspace left. I also modified my lid to have a 1 ½” TC fitting with a ¾” blow off tube so I was not too worried at this point….until the next morning. I got up the next day and went to check the progress of the brew. It was fermenting all right. It was chugging away so hard that the foam was blowing by the lid seal and dripping all over the floor! I guess when you’re using a 7th generation yeast culture; you need to expect a VERY wild fermentation! I found that I could not get a positive seal on the lid, thus forcing the blow off through the blow tube. I found out real quick that the standard hardware for securing the lid on a conical is just not good enough. My solution was to obtain a number of small C-clamps that I can position around the lid. This seems to be the best solution to getting a good seal on the conical, thus forcing the pressure of blow off through the blow off tube. This method usually needs some fine tuning of the placement of the clamps the next morning when the fermentation is going full steam. This is usually not a problem if you don’t intend to try and cram all the beer you possibly can into your conical, (who would try and do that?). Finally, when all else fails, you can always transfer a couple of gallons of beer into a carboy, thus allowing enough head space to put a regular airlock bubbler with stopper in place. The airlock bubbler and rubber stopper comes standard with the stainless conical fermentor and should do fine if you are keeping the batch size low enough to allow enough head space for fermentation. The ultimate question is how much headspace will you need? Sooner or later you may run into this situation, and that is why I’ve spent some time discussing the subject here. If I use my 12.5-gallon fermentor and want a knockout of exactly 10 gallons to the keg, I would want to have around 11 gallons of beer wort in the fermentor. This will give me a margin of one gallon of loss for dumping trub, yeast and taking specific gravity readings during the fermentation cycle. I should also mention that you would have some loss in the bottom of the cone below the racking port. This now leaves me a headspace margin of 1-½ gallons. The question is then, is this going to be enough? Maybe, maybe not. If I made a pint or two pint starter from a tube or two of yeast and expect a 7 to 12 day easy going fermentation, this may work. However, if I’m using my 4th generation or better-harvested yeast, I doubt it. My propagated yeast cultures beyond the 3rd generation tend to be highly explosive! In the 28-gallon brew mentioned earlier, I wanted a 25-gallon knockout for 5 corney kegs and have 3 gallons left for a cask ale in my 3-gallon corny keg. I may have had as much as 29 gallons in the 31-gallon fermentor. As I mentioned before, that was not enough headspace. I had the same problem doing a batch in my 12.5-gallon fermentor. It is difficult to get a good blow off rig through a rubber stopper, as you need as big a hole as possible, to assist in pressure relief. On the other hand, if you do a 5.5 to 6 or even 8 gallons, (some for the keg, some for bottling), in a 12.5-gallon conical, it’s not going to be a problem with just the rubber stopper and airlock. Just be aware that you will waste more beer using a conical fermentor. The answer? Make more beer of course!
As a last thought on the subject I should mention the beauty of harvesting and reusing your yeast, (my favorite part). When you get into the 5th or better generation yeast cultures, you will have explosive, fast fermentations. I have had 5-gallon batches of beer finish out in 24 hours! My 28-gallon batch finished out in 3 days. So if you are planning on doing a barley wine or another high gravity beer, no worries, it should finish out completely. No more stuck fermentations or overly sweet beers due to the yeast pooping out early! You should always use good sanitary practice when transferring or reusing yeast. I save mine in ½-gallon to 1-gallon jugs and put an airlock on to seal. I keep the yeast in a refrigerator and try and use it within 7 days, or make a starter to keep it viable and healthy. You can probably get away with longer storage time, but I would be worried about the health and viability of the yeast after seven days without making a starter wort to keep it going.
As mentioned above I have modified two of my fermentors with a TC fitting on the lid to enable me to use a large blow off rig and also to attach a Co2 ball lock fitting. This is a really great modification to your conical. If you have a local metal shop in your area that has stainless sheet stock and pro welders on hand, you can have this done for a reasonable cost. I had a piece of 12 gauge stainless at 24 inches plasma cut including the blow hole with the TC fitting welded in place for around $ 40.00. Maybe your thinking: what about using the lid that came with the fermentor? The problem is that the existing lid that came with your conical is made of really thin stock and would warp like a potato chip as soon as welding heat was applied to it. This is the reason it will have to be replaced. So all you really need is to obtain the TC fitting, measure the diameter of your lid and placement of where you want the TC welded on, (use your existing lid to measure), and take this to a local shop or just take your existing lid to show them. Request 12 gauge stainless at least. Be sure and mention that you need the lid to be as flat as possible when finished. They may need to hammer or press it to get it flat after welding. They have the tools to do this, I'm guessing most of us do not! Also tell them what it is for. You don't want a piece of stainless with huge scratches or gouge marks for sanitary reasons. Your existing rubber seal should fit the new lid with no real problem. This modification combined with the tip of using C-clamps to get a good seal on your lid makes a nice set-up for using a blow off rig when your cramming as much beer into the conical as possible as well as the advantage of using a ball lock Co2 fitting for when the fermentation is done and you are taking samples from the racking port or kegging. It's also quite cool to run your blow off hose into a small bucket of sanitizer to see and hear it chugging away just like the commercial brewers do! The blow off fitting that I use was made using a solid SS TC end cap, drilled to accept a 3/4" barb fitting, then brazed the barb fitting to the cap. Another option is buying a 1" TC fitting and attaching 1" vinyl hose to it. If you have the new Blickman Fermenator with the dome lid, you have better options without all the other modifications mentioned. Keep that in mind when making a purchase decision.
Finally I would like to mention the dump valve situation on a conical. If you have purchased a commercially built conical with a 1/2" pipe nipple and ball valve attached to the bottom for a dump valve, you probably don't want to change anything. Then again, if your like me, you can't hardly wait to modify it! If you are home building your conical or purchased a weld less fitting conical from Blickman, you may want to do the following modification: First get a Butterfly dump valve! You'll never regret it. Two of my conicals have the butterfly valve. The smaller one was commercially built with a 1/2" pipe nipple welded to it and I hate harvesting yeast through this fermentor. I have had sessions of standing around waiting for yeast to flow through this opening of 1/2" pipe fittings, that are reminiscent of watching paint dry! With the butterfly dump valve, you have the advantage of a much larger port to harvest yeast and the advantage of a true sanitary valve. My Fermenator conical, by Blickman came with weld less fittings. This made it easy to modify as I just widened out the existing holes and brazed in my TC fitting's. Another thing to consider when purchasing a SS conical is to buy one that already has the butterfly dump valve or is an option for purchase.
Sanitizing your conical and CIP:
Now that you have the 27 gallon conical by Blickman, what is the best way to sanitize it? Use 27 gallons of sanitizer every time? Here again is where your heavy duty lid with the sanitary TC fitting shines! I use a spinning spray ball that is fitted to a TC end cap with a 1/2" female threaded pipe fitting. This is mated to 3/4" hose and runs to the output of my high volume pump. The spinning spray ball fits down through the TC fitting and is clamped in place. I remove my racking valve and attach a piece of 3/4" hose with TC fitting for a return line to my 6 gallon supply bucket of sanitizing solution. This return line could also be attached to your bottom dump valve. The bucked has a 3/4" valve on the bottom for attaching to the pump input . You turn on the pump and the sanitizing solution is sprayed at 360* inside the conical and recirculates back to your bucket. After running the pump and solution for around 3 to 5 minutes, it is done. I then close the valve going to the bucket and run the 5 gallons of sanitizer into the conical. As I use a pump from the kettle to the conical, I drain this sanitizer by gravity through all my hose, aerator and counterflow chiller to sanitize everything that the wort will come in contact with, all with only using around five gallons of sanitizer. Another use of this set up is CIP or clean in place. Although I just usually use hot water and a green scrubby pad to clean my conicals when empty, you could use this method with the pump and spray ball and just fill your bucket with 170* solution of PBW to clean. I also use the spray ball to clean my corney kegs with a hot solution of PBW. I have an old keg that has a 1/2 pipe fitting welded into cross bars at the top of the keg. It has a fittings to recirculate cleaning solution with my pump. The corney kegs sit upside down on the cross bars with the spray ball shooting solution up inside. It works very well on those stubborn stains that are hard to clean.
I know that this has been a long-winded article relating to the use of conical fermentors, but I thought it would be useful for home brewers, as there is not a lot of information to be found on the web relating to the subject.
Here is a link to JVNW where I found the ball lock TC fitting. They have a good selection of parts but you should shop around at Beer Beer & More Beer, Austin Homebrew, Williams, St Pat's etc to get your best deal on parts. JV North West
Here is a link to the spinning spray ball that I use. It is PVDF plastic and fits through a 1 1/2" TC fitting. Spray Ball
Cheers and Beers,
Alan Johnson ![]()
return to: Deer
Island Brewery?
 HOME
HOME